Implementation of BitLocker to Go Encryption for Removable Storage Devices
With the mobile workforce growing continuously, it is a major concern for IT decision makers to protect sensitive data on mobile computers. Starting from Windows Vista, BitLocker Drive Encryption helps protect sensitive data from being accessed by unauthorized users. BitLocker To Go extends such data protection to USB storage devices, enabling access to be restricted with a password. BitLocker To Go can even be forced to apply on all removable drives in an organization by IT administrators through the group policy.
When the encrypted USB drive is plugged into a Windows 7 computer, you must key in the correct password before the drive can be read/written. Under Windows 7, a software called “Bitlocker To Go Reader” is automatically added to the USB drive when it is encrypted to enabling the software being subsequently copied to non-Windows 7 computers (e.g., XP and Vista computers) for reading files on the USB drive encrypted by the Windows 7. Such a arrangement basically makes the USB drive encrypted under Windows 7 essentially a read-only device when being plugged into any non-Windows 7 computer.
Installing BitLocker To Go
Setting up BitLocker To Go on a USB drive is a straightforward task. Once the USB drive is inserted, right-click the device in Windows Explorer and select Turn on BitLocker… from the pop-up menu as shown below:

As soon as the “Turn on BitLocker…” command is clicked, initialization will take place. This process is not fatal as the data on your USB drive will not be affected.
Once the initialization is done, BitLocker To Go will prompt you to set up a password or use a smart card + PIN for unlocking the drive. In our case, we will use the password option.

Once a password has been keyed in, the next step is to set up the recovery key, as shown in the following figure, to unlock your drive should you forget the password.

Next you will be prompted to begin the encryption process. It may take a while depending on the size of your drive. During the encryption process, there will be a dialog box (please see below) showing the progress of the operation.
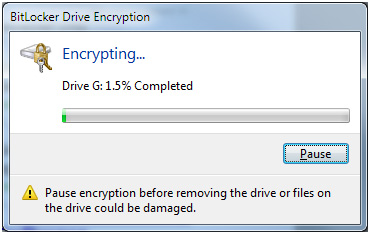
If for some reasons, you need to remove the drive during the encryption process, you must press the “Pause” button to stop the process; otherwise files stored on the drive may be damaged or lost.
Once the drive is encrypted, you will notice that the icon associated with the encrypted drive has changed, as shown in the following screen.

Using BitLocker To Go in Windows 7
When a BitLocker To Go encrypted drive is inserted to a PC with Windows 7, you will be prompted for the password immediately. The drive will be unlocked automatically when the correct password is entered. You can use the encrypted drive as usual.

Using BitLocker To Go in Windows XP/Vista
When a BitLocker To Go encrypted drive is plugged into a PC with Windows XP or Vista, you will be prompted to install the BitLocker To Go Reader, if autoPlay is enabled. After the Reader is installed, you will be prompted for the password to unlock the drive. The BitLocker To Go Reader window, which looks like Windows Explorer, appears.


With the BitLocker To Go Reader application, you can only read files and copy them to your PC. You will encounter an error if you try to save files back to the drive because no operating system prior to Windows 7 is capable of writing to a BitLocker To Go encrypted drive. Furthermore, it is not possible to directly open any files inside the BitLocker To Go Reader, attempting to do so will bring up a pop-up window as shown below, to prompt you to copy the file to the Desktop first.

For details, please refer to http://blogs.techrepublic.com.com/window-on-windows/?p=1176
